
Communicating about code is hard. The way we write code is not the way we talk about code.
Since we hold most our code in our heads, sometimes jotting down our thoughts is surprising helpful.
Yet, most note taking tools allow you to capture your thoughts but don’t allow you to link those thoughts to the most important thing...the code. When your notes are linked directly to the content you’re discussing, the code, it leads to deeper understanding.
You might use comments in your day-to-day process, but they aren’t the right place to tell the complete story of how the code works, and rarely do you share the “why” behind choices you make while writing code. And simple things, like keeping track of the locations in the code you want to pair and collaborate with a teammate – these can be hard with existing tools. That’s where CodeSee Stories comes in.
Stories are a flexible tool to help you develop an understanding of your code, connect it directly to a specific line of code and then share both your code and your understanding with others creating a
Stories in CodeSee let you build a narrative around the code in whatever order makes the most sense. You can tie snippets of code together from across the codebase, regardless of where the code appears in the structure of the files and folders.
Whether you are trying to capture tribal knowledge, transfer your knowledge to others or capture your scratch notes in the moment, stories can help.
How to use stories:
- To create a new story in your data flow, expand the story bar on the far right of the screen. Add a title and optional description to your story.
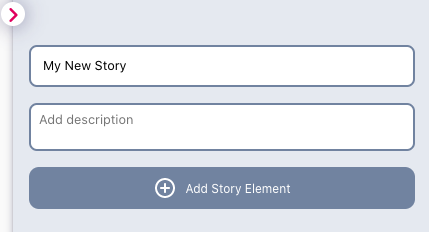
2. Click “Add Story Element.”
3. Add content to your story element. These are free form blocks for you to:
- Make notes to yourself
- Add reminders to revisit particular locations
- Make plans to modify particular parts of code in the future.
- Mark the important parts of the execution flow.
- Anything you want really...
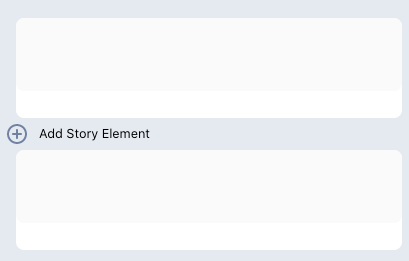
4. Story elements can also be easily added between other elements by hovering between elements:
5. Link code to stories.
- Story elements can be linked or connected to code that they are referring to.
- Click on “Link to code regions.”
- On the right side of the data flow checkboxes will appear allowing you to select which lines of code you want to connect to a story element.
- Click the “Save links to regions” button to confirm your selections.
- Once linked, the link icon will indicate that code has been connected to a story element. Clicking on this icon takes you to the link of code that is linked and highlights it for you.

6. Saving stories
The text you write in stories is saved automatically. You’ll see a notification at the top of the stories panel when this is happening.
7. Sharing stories
Stories are private by default: only you can access the data flow and stories you’ve added. If you want to share your story and data flow with others, click the Share icon, then choose “Public” or “Organization.” If you select Public, anyone you share the URL with will be able to see your story. If you select Organization, anyone with a CodeSee account using the same email domain as you will be able to see the story and data flow.